Home - Color Calibration Management Console User Guide for Mac OS X
Acquiring Color Measurement Data For Any Color Chart
The procedure for printing a color chart, measuring the colors, and saving the color measurement data on a computer is as follows.
The color measurement data saved on the computer can be used such as for creating ICC profiles. ICC profiles are created using commercially available software.
Created ICC profiles can be used by the printer driver.
Note
This step can be executed when a printer that has a spectrophotometer unit installed is selected.
Getting the Printer Ready
1. Confirm whether the paper to be loaded can be used for acquiring color measurement data.
2. Load the paper.
Note
If Adj. Quality has not been executed even once on the paper you are using, execute Adj. Quality in the control panel menu.
3. Select the White/Black Backing Plate color.
Acquiring Color Measurement Data
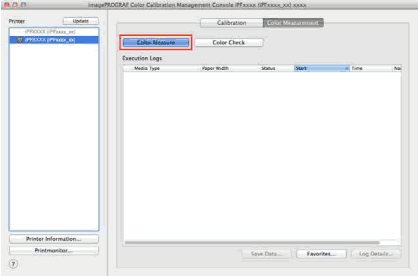
1. Open the Color Measurement sheet.
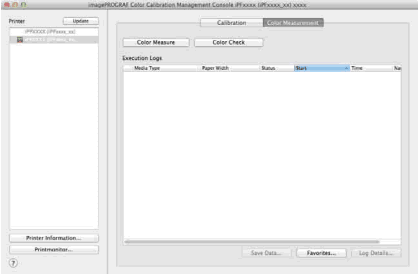
2. Select the printer you want to measure the color chart on from the Printer list.
3. Click the Color Measure button.
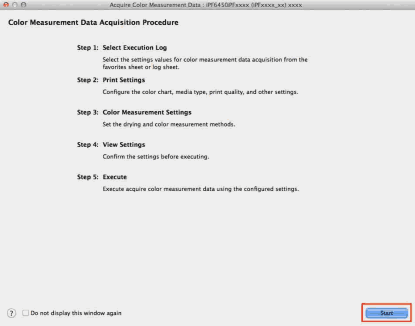
4. Check the color chart measurement procedure in the procedure description window and then click Start.
5. Select New in Favorites and then click Next.
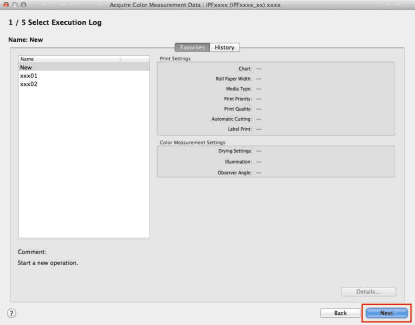
Note
To perform color chart measurement using the setting values when executed previously, select the execution log in the Favorites sheet or History sheet.
6. Select the color chart, configure the color chart print settings, and then click Next.
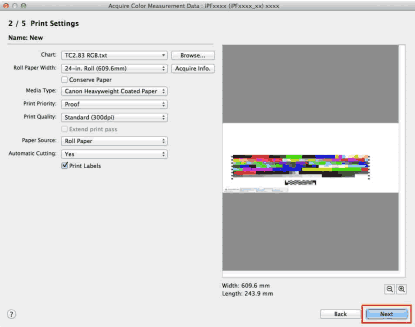
| Setting Item | Details |
| Chart | Selects the color chart to print. If the color chart you want to print is not displayed in the list, click the Browsebutton and then select the color chart. You can only select color chartsthat are CGATS format RGB. |
| Roll Paper Width | Click the Acquire Info. button to display the paper width of the roll loaded in the printer. |
| Conserve Paper | Selecting this check box allows you toconserve paper by reducing the gap between the pieces of a color chart when the chart is printed split into pieces. |
| Media Type | Select the type of paper. |
| Print Priority | Choose the graphic elements that you want to emphasize for printing. |
| Print Quality | Choose the print quality. |
| Extend print pass | Uneven printing may occur when printing with the Highest setting in Print Quality. Selecting this check box may improve the uneven printing. However, the printing speed will be reduced. |
| Paper Source | Selects the paper source. |
| Automatic Cutting | Selects how to cut the paper when Acquire Color Measurement Data finishes. |
| Print Labels | Select this check box to print the color chart printing information. |
7. Configure the color measurement settings and drying settings, and then click Next.
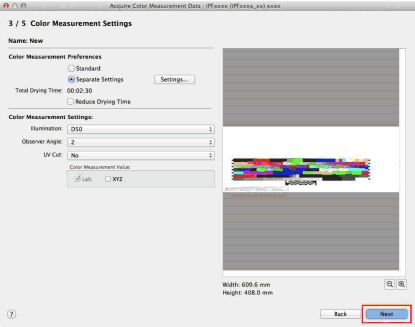
| Setting Item | Details |
| Color Measurement Preferences | Configures the pattern size to print the color charts and the drying settings for the printed color charts. Choose Standard to print at the standard pattern size and dry using the standard setting values. Click the Settings button to display the Color Measurement Preferences dialog box, which allows you to configure the pattern size and drying method in detail.(*1) |
| Reduce Drying Time | Selecting this check box reduces the drying time. Once the time configured in the Color Measurement Env. sheet in the Preferences dialog box has elapsed, color measurement proceeds without performing any further drying with the ventilation fan. Specify a time that offers sufficient drying by air drying in the Preferences dialog box. If you perform color measurement while the ink is not dry, the measurements may not be correct. The Preferences dialog box is displayed when you click Preferences in the imagePROGRAF Color Calibration Management Console menu. If the number of patterns is small, drying will finish in a shorter amount of time than the time configured in the Preferences dialog box. If this happens, the drying time will not be reduced even if the Reduce Drying Time check box is selected. |
| Illumination | Select the illumination from D50, D65, and A. |
| Observer Angle | Selects the observer angle. |
| UV Cut | Selects whether or not UV cut is used. |
| Color Measurement Value | Saves the color measurement data for the color measurement values where the check box is selected. The Lab check box cannot be cleared. |
*1:If you want to enlarge the color chart pattern or configure the color chart drying settings in detail, click the Settings button to display the Color Measurement Preferences dialog box.
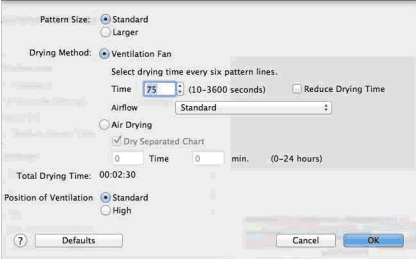
| Setting Item | Details |
| Pattern Size | Selects the pattern size of the color chart. We recommend Larger when you want to prioritize the color measurement precision. |
| Drying Method | Choose Ventilation Fan to dry using the ventilation fan or Air Drying to dry without using the ventilation fan. |
| Ventilation Fan | Configures the drying time and airflow for the ventilation fan. |
| Time | Configures the drying time for the ventilation fan for each pattern. The number of lines that are dried at one time by the ventilation fan varies depending on the size selected in Pattern Size. As the time increases, the adhesion of the ink improves and the color tones become more stable. |
| Reduce Drying Time | Selecting this check box reduces the drying time. Once the time configured in the Color Measurement Env. sheet in the Preferences dialog box has elapsed, color measurement proceeds without performing any further drying with the ventilation fan. Specify a time that offers sufficient drying by air drying in the Preferences dialog box. If you perform color measurement while the ink is not dry, the measurements may not be correct. The Preferences dialog box is displayed when you click Preferences in the imagePROGRAF Color Calibration Management Console menu. If the number of patterns is small, drying will finish in a shorter amount of time than the time configured in the Preferences dialog box. If this happens, the drying time will not be reduced even if the Reduce Drying Time check box is selected. |
| Airflow | Selects the airflow of the ventilation fan. |
| Air Drying | Sets the period between the color chart being printed and the color measurement starting. If the Dry Separated Chart check box is selected, printing and air drying are repeated for each separated color chart. This makes it harder for the color charts to become scratched or soiled, but also increases the time taken by the operation. If the Dry Separated Chart check box is clear, printing and air drying the color chart are performed once. This reduces the time taken by the operation, but may scratch or soil the end of the color chart and paper. However, this does not affect the color measurement results. |
| Position of Ventilation Fan | If you are using paper that has a tendency to curl or paper that does not dry easily, select High so that the paper does not come into contact with the paper presser. Note that when High is selected, we recommend that you set the Time longer and the Airflow stronger compared with when Standard is selected because of the larger distance between the ventilation fan and paper. |
8. The View Settings window is displayed. Check the details of the settings and click the OK button.
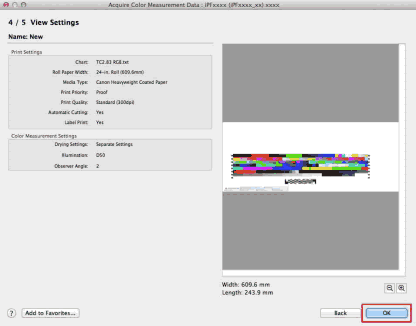
Note
Click the Add to Favorites button to display the Add to Favorites dialog box, which allows you to add the setting details to favorites.
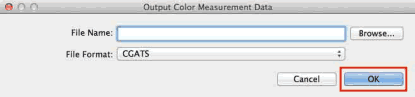
9. The Output Color Measurement Data dialog box is displayed.
Select the file to save the color measurement data into and click the OK button.
10. The Acquire Color Measurement Data dialog box is displayed.
Click the Execute button.
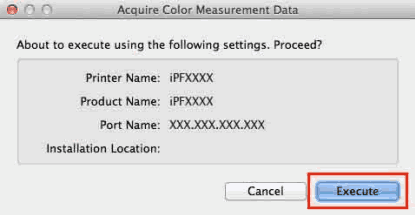
The color chart is printed and color measurement begins.
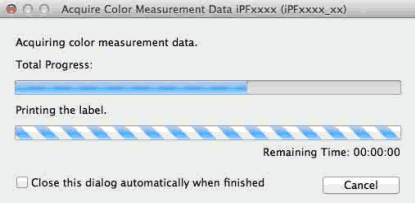
Note
You can exit the acquire color measurement data operation in the middle by clicking the Cancel button. However, it may take some time to end.
11. Click the OK button.
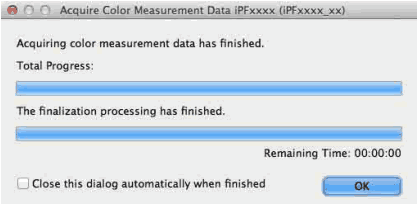
Once the color measurement has finished, the color measurement data is saved on the computer.